Infinispan Insights: Securing Infinispan with Keycloak

This tutorial shows you how to secure your Infinispan cluster using Keycloak. To understand the basics of Infinispan Security, check this blog post before.
Key Points:
-
Learn how to create a security realm in Keycloak.
-
Override the default security realm in Infinispan.
-
Authentication and authorization in Infinispan with Keycloak.
Infinispan and Keycloak in a nutshell
About Infinispan
Infinispan is an open-source, in-memory distributed key/value data store. It is designed to provide fast and scalable access to frequently accessed data by storing it in memory. In addition to caching, Infinispan offers features for data distribution, replication, and partitioning, making it suitable for use in distributed and clustered environments.
Infinispan is often used in scenarios where low-latency access to data is critical, such as caching frequently accessed database queries, session data in web applications, or other use cases where quick access to data can improve overall system performance
About Keycloak
Keycloak is an open-source identity and access management solution developed by Red Hat. It provides functionalities for identity and access management, including features like single sign-on (SSO), user authentication, authorization, and user federation. Keycloak is designed to simplify the implementation of security protocols and standards such as OAuth 2.0, OpenID Connect, and SAML. Some key features include Single Sign-On (SSO), Identity Brokering, User Authentication, User Federation, RBAC and more.
Infinispan and Keycloak
Keycloak uses Infinispan as its underlying data store for caching and storage purposes. Infinispan provides scalable and efficient caching of authentication and authorization-related data. This helps improve performance and responsiveness, especially in scenarios where quick access to user session information and other identity-related data is crucial.
Some ways Keycloak leverages Infinispan include Caching User Sessions, storing Authorization policies, providing distributed caching, improving performance, failover recovering and more.
What about Infinispan leveraging Keycloak ?
Infinispan provides several ways to handle authentication and user management. By default, the security realm is properties based. However, token based authentication is supported and Keycloak can be used for that purpose.
Creating a Security Realm in Keycloak
Run Keycloak in dev mode
The easiest way to use Keycloak on your laptop is in a container using the development mode. Because we’re going to run Keycloak in one container and Infinispan in another, let’s set up a network to connect them.
For Linux users, there’s an option called network_mode: host that might be available to you instead of using a network bridge. However, since this option doesn’t work for Mac or Windows currently, we’ll focus on the method that suits all operating systems.
docker network create -d bridge mynetwork
docker run -p 8080:8080 --network=mynetwork --name=keycloak -e KEYCLOAK_ADMIN=keycloak -e KEYCLOAK_ADMIN_PASSWORD=keycloak quay.io/keycloak/keycloak:latest start-dev
Keycloak Image will create an administrator user by defining the KEYCLOAK_ADMIN and KEYCLOAK_ADMIN_PASSWORD environment variables.
After getting the container up and running, go to http://localhost:8080 Click on the Administration Console link, and log in using the credentials "keycloak/keycloak".

Create a realm
Keycloak realms are a fundamental concept in Keycloak. Realms in Keycloak serve as a way to isolate and manage different sets of users, applications, and their associated configurations.
Using the web administration tool, create a new realm called "Infinispan". This realm is what the Infinispan Server will use in the later steps of this tutorial.
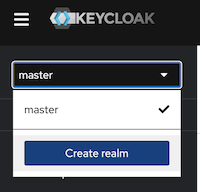
Name your realm “infinispan”.

Create the Infinispan clients
Clients are entities that can request authentication of a user. Clients come in two forms. The first type of client is an application that wants to participate in single-sign-on. These clients just want Keycloak to provide security for them. The other type of client is one that is requesting an access token so that it can invoke other services on behalf of the authenticated user.
For the Infinispan Server and testing the Console security, we’ll require two clients set up in Keycloak: one named "infinispan-console" and the other "infinispan-server".
Infinispan Console Client
Create a Keycloak client named “infinispan-console”. The Infinispan Web Console uses this client to authenticate console users with Keycloak in order to obtain an authentication token. This token is then used to authenticate all requests by the console to the Infinispan server.

Configure the valid redirect URIs with Infinispan’s console URI: http://localhost:11222
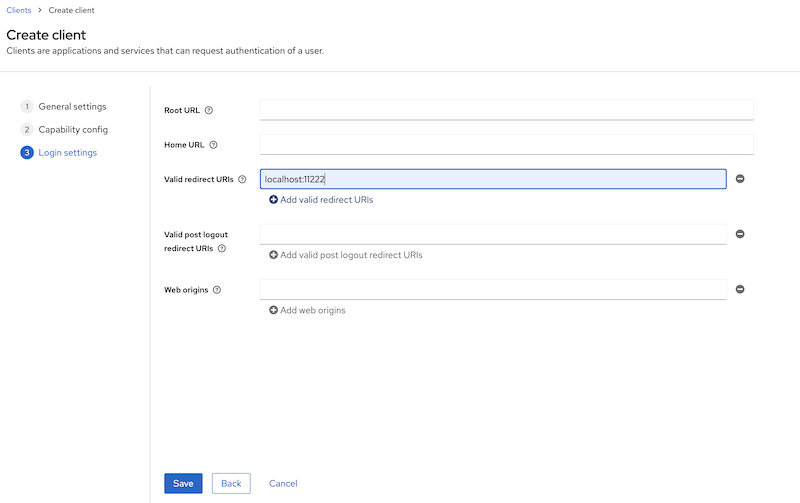
This step is completed.
Infinispan Server Client
Create a second client called "infinispan-server". Set "client authentication" to "ON". This defines the type of the OIDC client. When it’s ON, the OIDC type is set to confidential access type. When it’s OFF, it is set to public access type ("infinispan-console" client type).
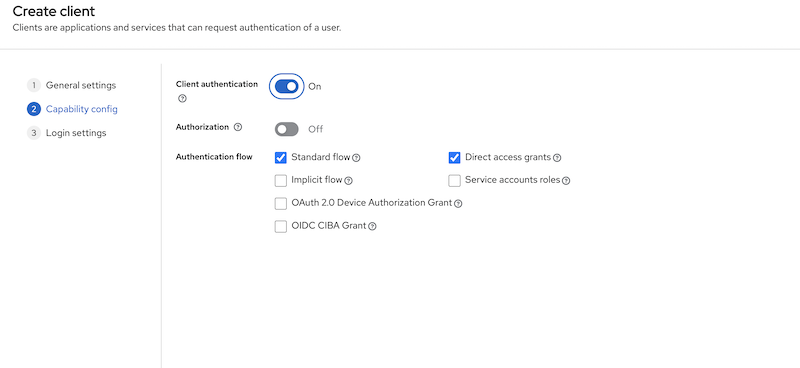
This step is completed.
Create a user
Once we have the two clients created, we need to create an admin user for Infinispan.
Click on the "users" menu, and create a user named "admin".

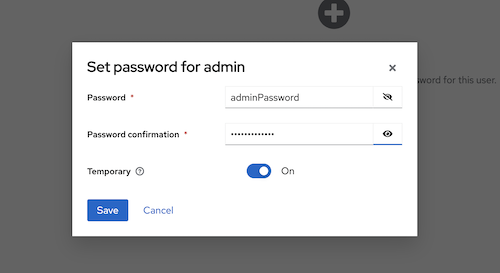
Once the user admin is created, navigate to the user detail page.
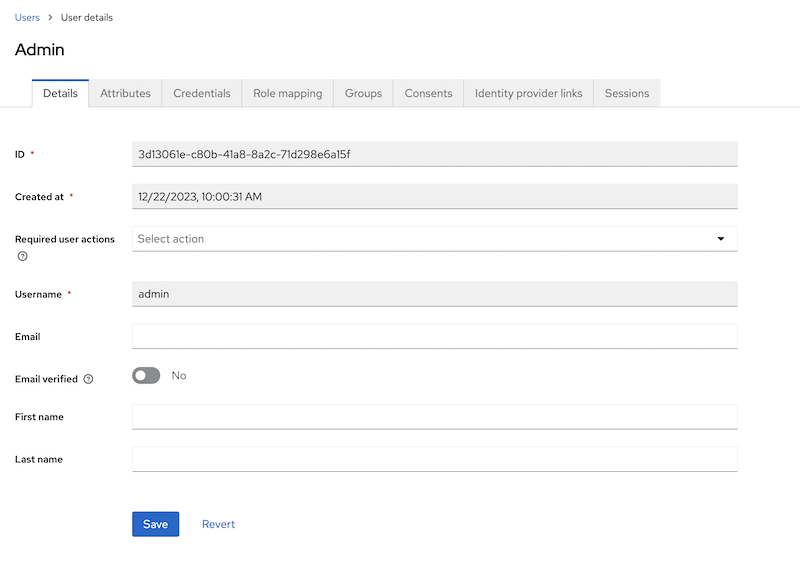
In the credentials tab, create a password for the user, for example, "adminPassword".
We are now ready to run Infinispan.
Running Infinispan secured with a Keycloak realm
Create the Infinispan security realm configuration
You can configure this in XML, JSON, or YAML. In the example provided below, the configuration is in YAML format.
Create a file named infinispan-token-realm.yaml with the following content.
infinispan-token-realm.yaml
server:
 security:
   securityRealms:
     - name: default
       tokenRealm:
         name: infinispan
         authServerUrl: 'http://keycloak:8080'
         client-id: infinispan-console
         oauth2Introspection:
           clientId: infinispan-server
           clientSecret: 'COPY AND PASTE THE SECRET FROM KEYCLOAK'
           introspectionUrl: 'http://keycloak:8080/realms/infinispan/protocol/openid-connect/token/introspect'
We are not done yet!!
Read the following sections to understand and change the placeholders in the file.
Default Security Realm name
The security realm is named "default". This file is designed to replace the default security realm in Infinispan, which is originally based on properties, with the configuration for this token-based realm.
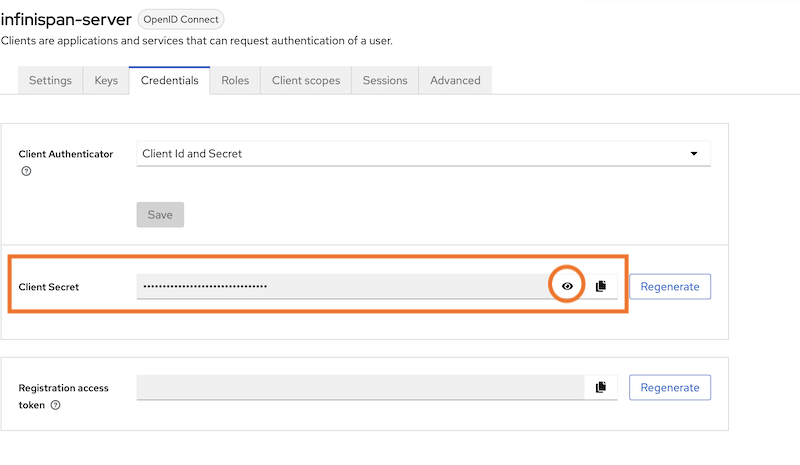
Client Secret
Retrieve the secret for the "infinispan-server" client from the Keycloak Administration, and then paste the secret value into the file replacing 'COPY AND PASTE THE SECRET FROM KEYCLOAK'.
Authentication Server URL - authServerUrl
The authentication server is Keycloak, and it’s running at localhost:8080. However, in the YAML configuration above, we used "keycloak" instead of "localhost" (the container name). This adjustment is needed when running containers in a Docker network. The Infinispan Server will be reaching out to the Keycloak Server inside the Docker environment. As mentioned earlier, Linux users can use "localhost" with the network_mode: host configuration.
Run the Infinispan Server overriding the default security realm
Lets run Infinispan in a container providing the created security realm configuration.
docker run -it -p 11222:11222 -v $(pwd):/user-config
--network=mynetwork
--name=infinispan quay.io/infinispan/server:15.0
-c infinispan.xml
-c /user-config/infinispan-token-realm.yaml
The command:
-
Creates a volume "user-config" in the current directory where we created the file
infinispan-token-realm.yaml -
Attaches the container to the network "mynetwork" so Infinispan and Keycloak can connect
-
Uses
-c, which means the container is using the default configuration file,infinispan.xml. Yet, specifying another-cfile, it adds the content ofinfinispan-token-realm.yamltoinfinispan.xml. Since this file configures the default security realm, the original Infinispan default properties realm will be replaced with the token-based realm.
Verify the changes
Accessing the following URL provides the information used by the Infinispan Web console to handle authentication.
{
   "mode": "OIDC",
   "clientId": "infinispan-console",
   "ready": "true",
   "realm": "infinispan",
   "url": "http://keycloak:8080"
}
The Infinispan Console will use the information above, and making use of the Keycloak Javascript Adapter, the interface will redirect to Keycloak for user authentication.
Connect to the console with the admin user
Go the console web URL: http://localhost:11222
This site can’t be reached
The console needs to access Keycloak from outside the container.
However, the realm configuration uses keycloak host.
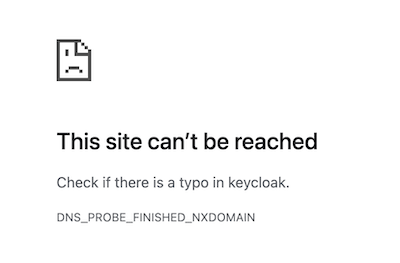
To avoid this issue, the workaround is simple: add to the following line to the /etc/hosts file:
127.0.0.1 keycloak
As mentioned before, If you are using linux you can avoid this by using localhost and running both containers with network_mode: host.
Authenticate using Keycloak
When opening the Infinispan Console, Infinispan will attempt to make a call to a REST API that requires authentication. You’ll be redirected to the Keycloak authentication, where you should use the credentials admin/adminPassword. When you initially connect as admin, you’ll be prompted to change the password. For this example, you can stick with "adminPassword".

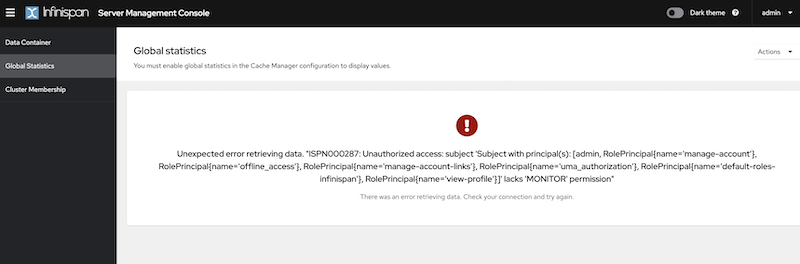
After Keycloak redirects back to the Infinispan Console, you can verify that admin is authenticated. However, you will encounter Unauthorized errors in the console interface, since the connected user’s roles are not known by Infinispan.
Create and assign Infinispan ADMIN role
To grant complete access to the admin user, it’s necessary to create a role named "admin" and assign that role to the user in Keycloak.
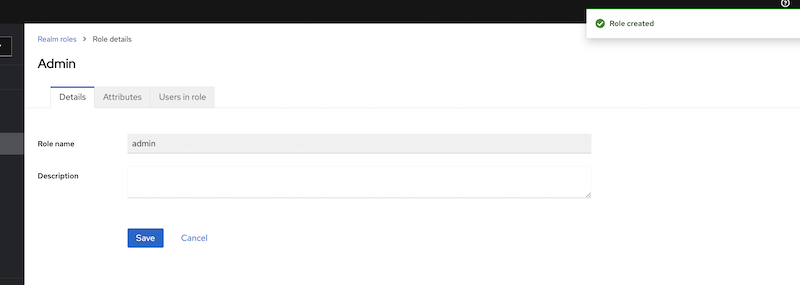
Create the ADMIN role in Keycloak
Open the Keycloak administration interface, click on "Roles", and then create a role with the name "admin".
Assign the ADMIN role in Keycloak
In the admin user detail page, go to the Role Mapping tab and assign the previously created "admin" role there.
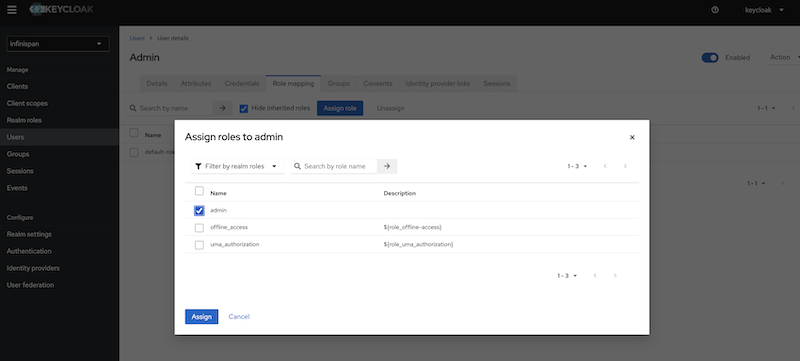
Return to the Infinispan Console, and you’ll notice that the admin user is now granted the admin role in Infinispan as well.
To go further
In the Infinispan Simple tutorials repository you will find an example with docker-compose, for Linux and non linux users. There are many other advanced features in Keycloak, this is just the most simple use case.
Learn more about it in the Keycloak and Infinispan documentation.
Get it, Use it, Ask us!
We’re hard at work on new features, improvements and fixes, so watch this space for more announcements!Please, download and test the latest release.
The source code is hosted on GitHub. If you need to report a bug or request a new feature, look for a similar one on our JIRA issues tracker. If you don’t find any, create a new issue.
If you have questions, are experiencing a bug or want advice on using Infinispan, you can use GitHub discussions. We will do our best to answer you as soon as we can.
The Infinispan community uses Zulip for real-time communications. Join us using either a web-browser or a dedicated application on the Infinispan chat.
Katia Aresti
Katia Aresti is a Senior Software Engineer working for Red Hat since 2017. She is part of the core Infinispan team, reponsible of the integration with other frameworks such as Spring-Boot, Vert.x or Quarkus, developing new features such as Clustered Counters, REST API endpoints and the new Server Web Console.


